Assign a Course
📌 Overview
Assigning courses ensures your learners receive the right training content. You can assign courses to individual members or groups with just a few clicks, and Quinn will automatically send them an email with access. You can also schedule assignments for a future date so the course goes out at exactly the right time.
Watch the tutorial video above
Option 1: Assign from the Courses Page
From the top menu, click Courses to view your course library.
Select the course you want to assign.
Click Assign Course.
Assign to Individuals
Go to the Invite by Email tab.
Use the dropdown list to select one or more members.
Assign to Groups
Switch to the Assign by Group Name tab.
Select one or more groups to assign the course to.
Click Assign to complete.
Option 2: Assign from the Groups Page
Go to the Groups page and select the group you want to manage.
Click Add Course.
Choose the course you want to assign and confirm.
Schedule an Assignment for Later
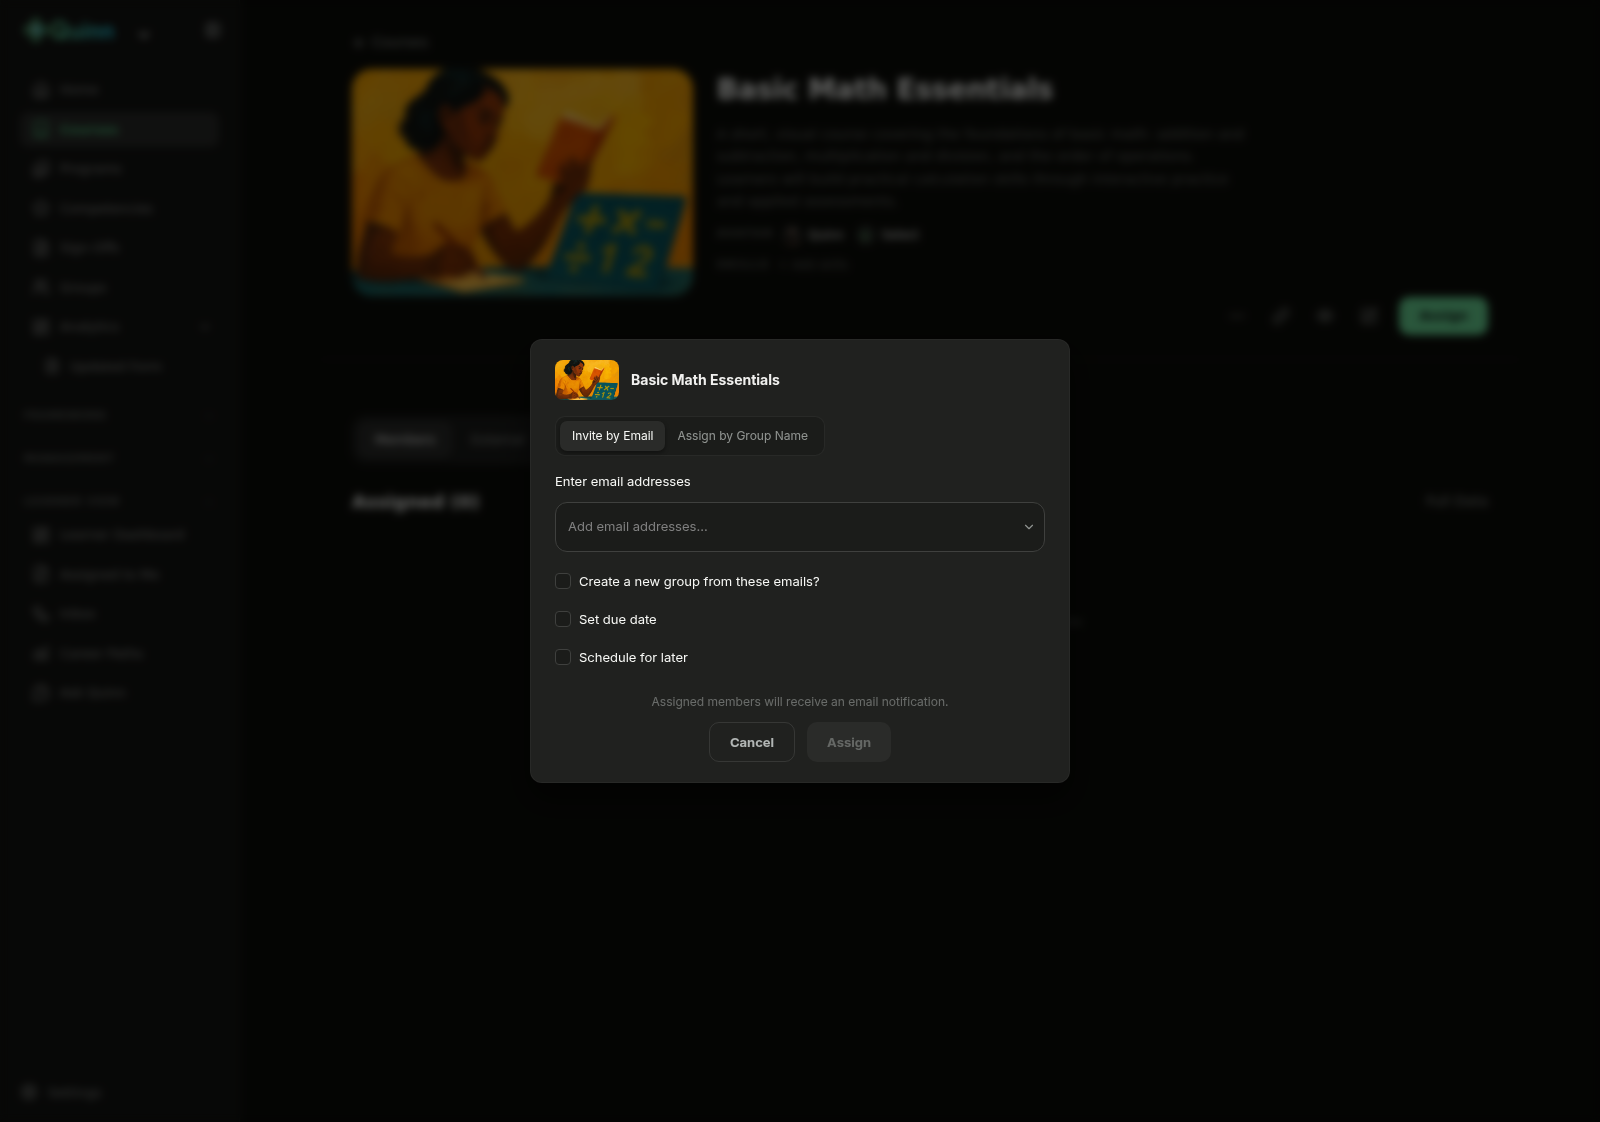
Instead of sending the assignment immediately, you can schedule it for a future date and time.
Step 1: Open the Assign Modal
Follow the steps above to open the Assign Course modal — either from the Courses page or the course detail page.
Step 2: Select Recipients
Choose the members or groups you want to assign the course to, just like a normal assignment.
Step 3: Enable Scheduling
At the bottom of the assign modal, check the Schedule for later checkbox. A date and time picker will appear.
Step 4: Pick a Date and Time
Select the date and time you want the assignment to go out. You can also choose a timezone to make sure it sends at the right local time. The default is your browser's timezone.
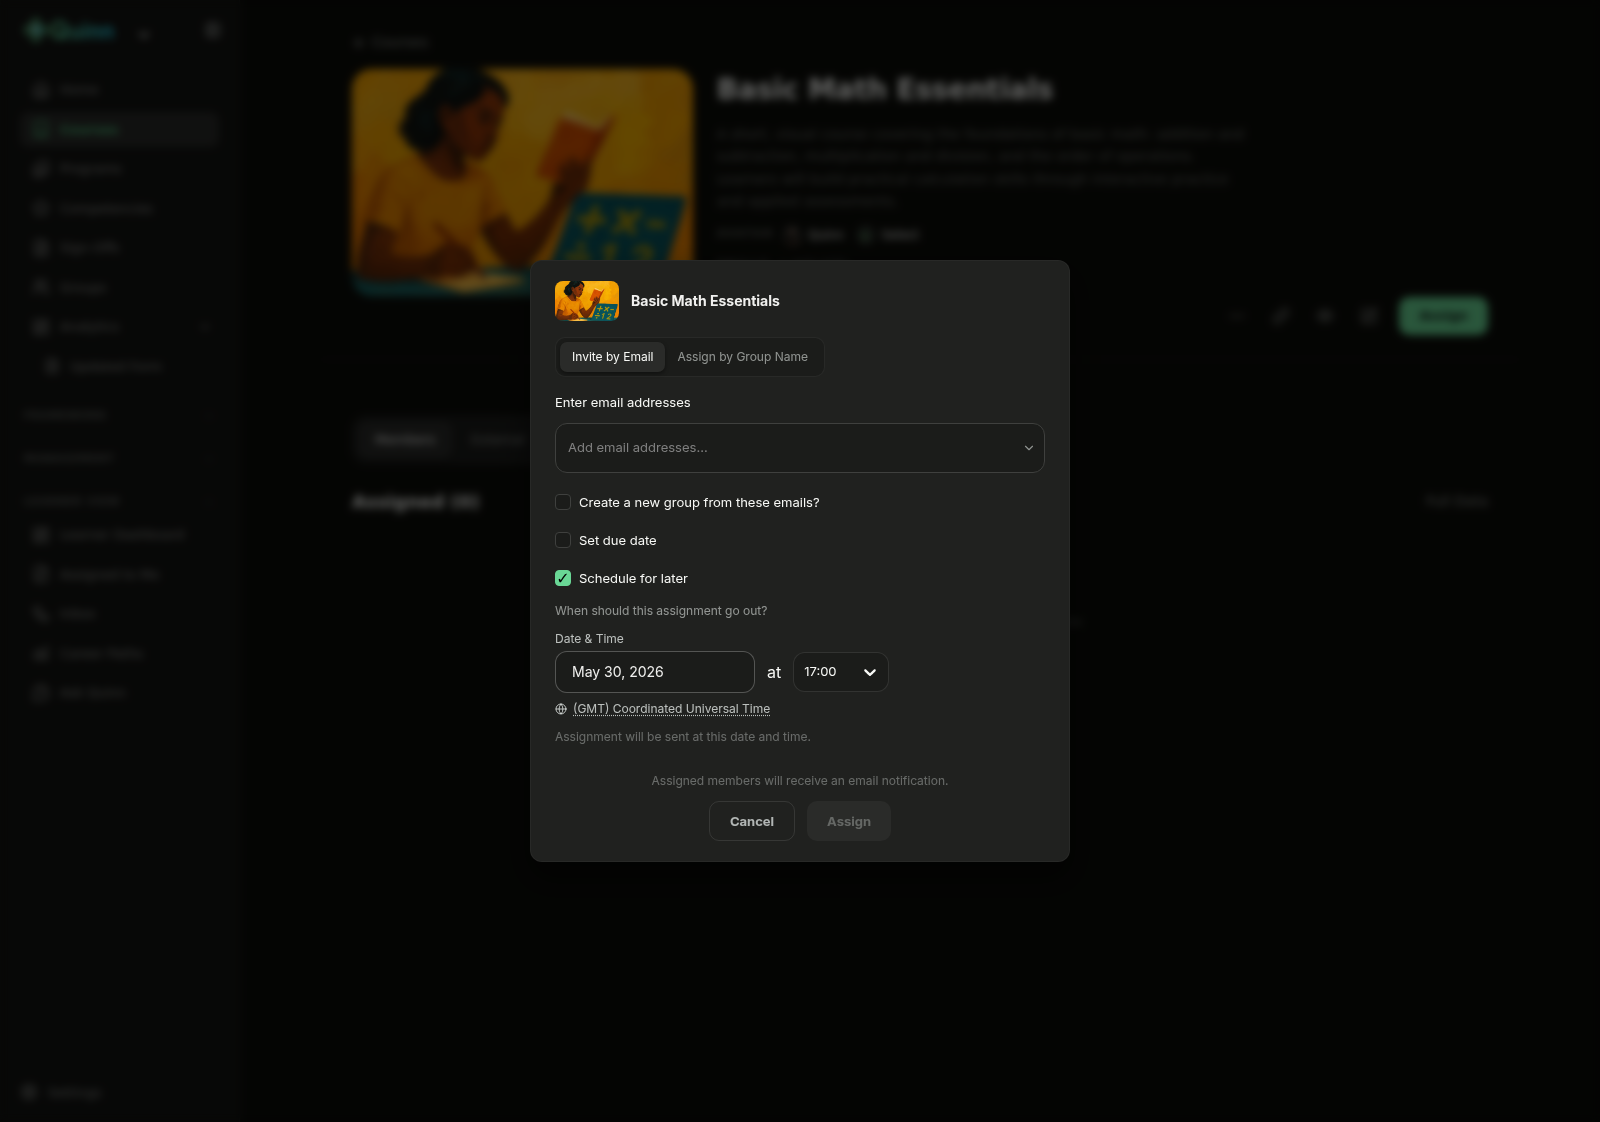
💡 Tip: The date must be in the future — Quinn will show an error if you pick a past date.
Step 5: Confirm
Click Assign. The assignment won't be sent yet — it will appear as a Scheduled assignment on the course detail page with the scheduled date shown.
Managing Scheduled Assignments
- View: Scheduled assignments appear on the course detail page with a "Scheduled" label and the send date.
- Edit: Click the action menu on a scheduled assignment to change the date or time.
- Cancel: Click the action menu and select Cancel Schedule to remove it before it sends.
Set Up a Recurring Assignment
For training that needs to repeat — like an annual compliance refresher — you can set a course to reassign itself automatically on a schedule. Each time it repeats, the learner's progress resets so they retake the course from the start.
Step 1: Schedule the Assignment
In the Assign Course modal, select your recipients and check Schedule for later, then pick the first send date under When should this assignment go out?
Step 2: Turn On Recurring Assignment
Check Recurring assignment. Under Every, enter a number and choose an interval — day(s), week(s), or month(s) — then click Assign. Quinn will reassign the course automatically each cycle.
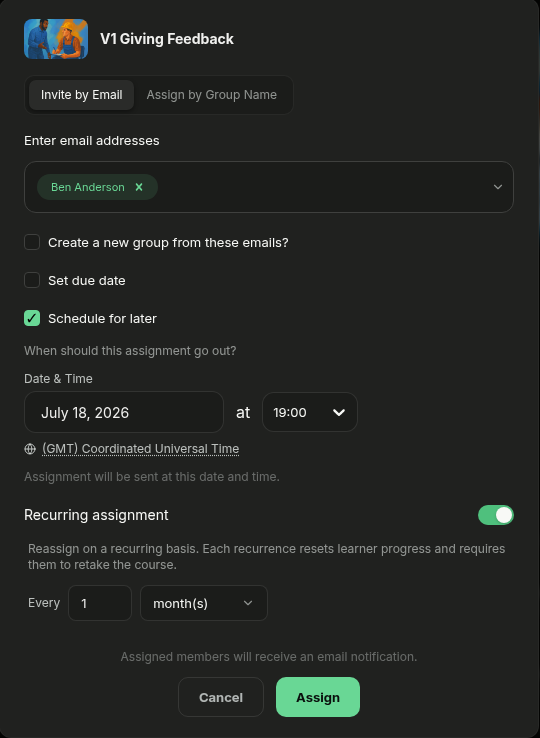
💡 Tip: Each recurrence resets the learner's progress and requires them to retake the course, so use it for content that must be re-completed rather than one-time training.
Step 3: Manage Recurring Assignments
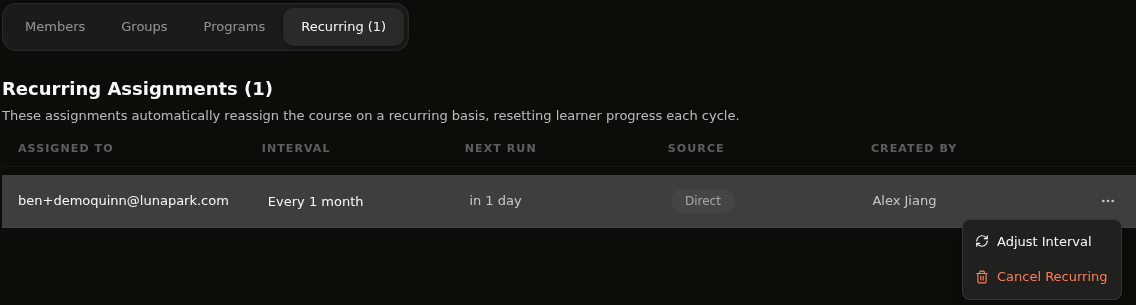
Open the course and select the Recurring tab to see every recurring assignment. Each row shows Assigned To, Interval, Next Run, Source, and Created By. Use the ⋯ menu on a row to Adjust Interval or Cancel Recurring.
Unassign a Course
If a course was assigned by mistake or is no longer relevant, you can unassign it directly from a learner's profile page. The learner's progress is preserved, but the course will no longer appear in their My Courses list.
Step 1: Open the Learner's Profile
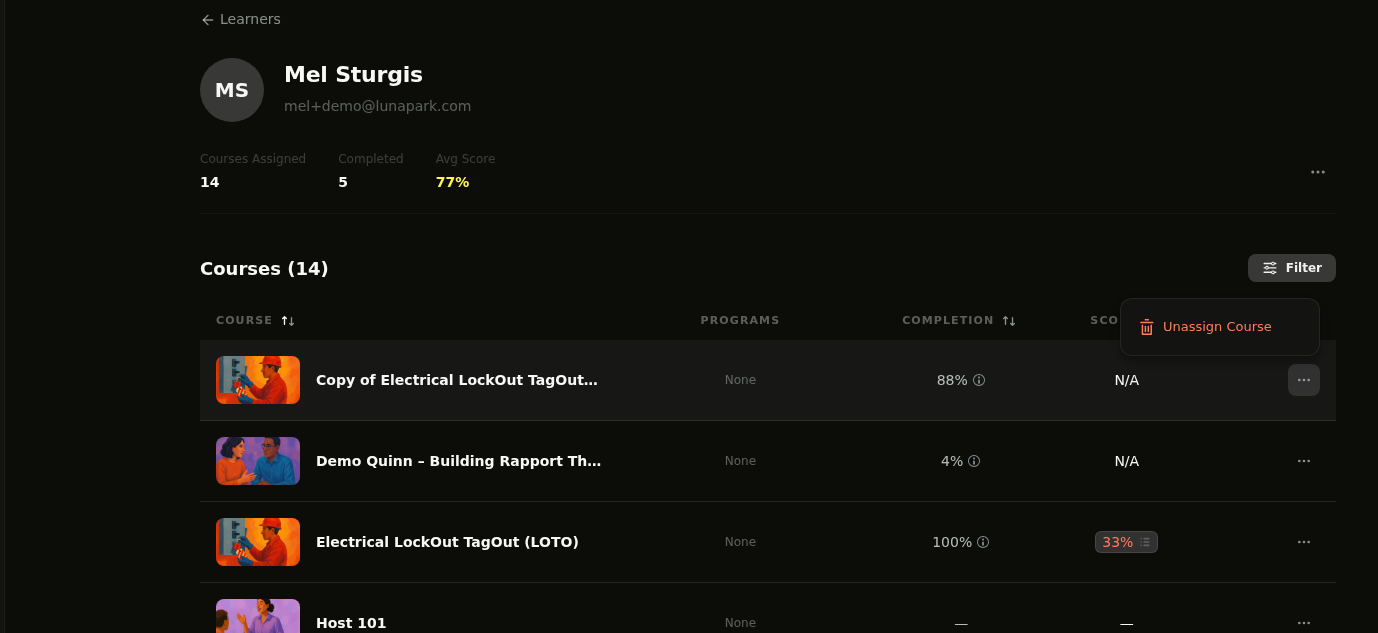
Navigate to the Learners page and click on the learner whose course you want to remove. You'll see their profile with a list of all assigned courses under the Courses tab.
Step 2: Click Unassign Course
Find the course you want to remove in the list. Click the ⋯ (three-dot menu) in the Actions column for that course, then select Unassign Course.
Step 3: Confirm the Unassignment
A confirmation dialog will appear showing which course will be removed and from which learner. Click Unassign to confirm, or Cancel to go back.
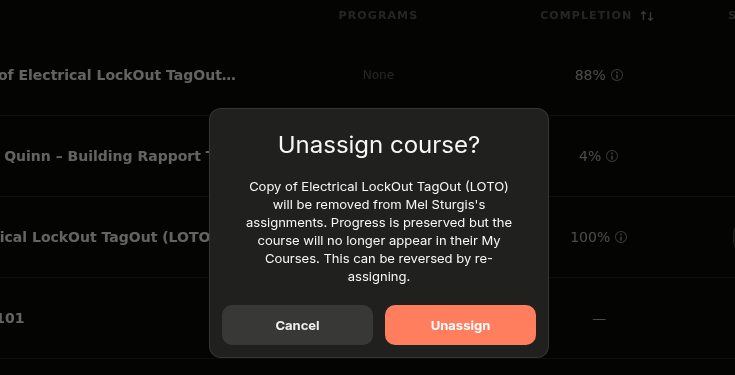
💡 Tip: Unassigning a course preserves the learner's progress. If you re-assign the same course later, they can pick up where they left off.
Configure Assignment Notification Channels
By default, Quinn sends an email to learners when a course is assigned. You can change this to SMS only or both email and SMS from your Organization Settings.
Step 1: Open Organization Settings
Click your profile icon in the top-right corner, then select Organization Settings from the sidebar. Scroll down to the Learning Experience section and find Assignment Notification Channels.
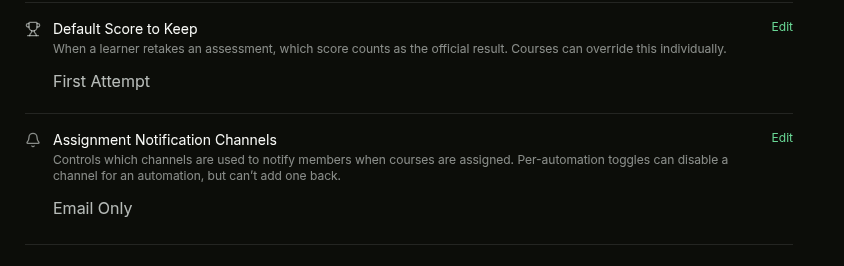
Step 2: Choose a Channel
Click Edit, then select your preferred notification channel from the dropdown:
- Email Only — learners receive an email when a course is assigned (default)
- SMS Only — learners receive a text message instead
- Email & SMS — learners receive both an email and a text message
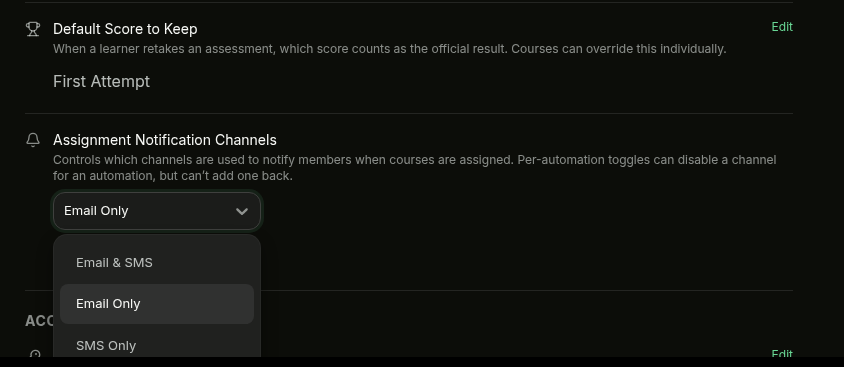
Click Save to apply the change. All future course assignments will use the selected channel(s).
💡 Tip: This setting applies org-wide. Individual automations can disable a channel, but cannot add one that isn't enabled here.
💡 Tips
Assigned members will automatically receive an email with a direct link to start the course.
You can assign the same course to multiple members or groups at once to save time.
Use groups when assigning recurring or role-based training for easier management.
Track learner progress using Course Reports.
Use scheduled assignments for onboarding — set up training to go out on a new hire's start date.