Create and Assign Programs
📌 Overview
Programs in Quinn allow you to organize multiple courses into a single structured learning path. This helps guide learners through progressive training sequences and makes it easy to assign bundled learning experiences to teams or individuals.
Watch the tutorial video above
Step 1: Create a Program
Go to the Programs page from the top menu.
Click Create Program.
Enter a program name.
From the dropdown list, select the courses you want to include.
Click Create Program to save.
Step 2: Assign a Program
Assigning a program works the same as assigning a single course.
You can assign it to:
Individual members using the Invite by Email tab.
Groups using the Assign by Group Name tab.
Step 3: Manage or Share the Program
Use the options menu to:
Generate an LMS link or SCORM package for your program.
Delete the program if it's no longer needed.
Step 4: View and Edit Program Details
Click into any program to open its detail view.
From here, you can:
Reorder the courses.
Add or remove courses.
Manage enrolled members.
Add Courses to a Program from the Courses Page
You can add multiple courses to a program at once without opening each program individually.
Step 1: Select Multiple Courses
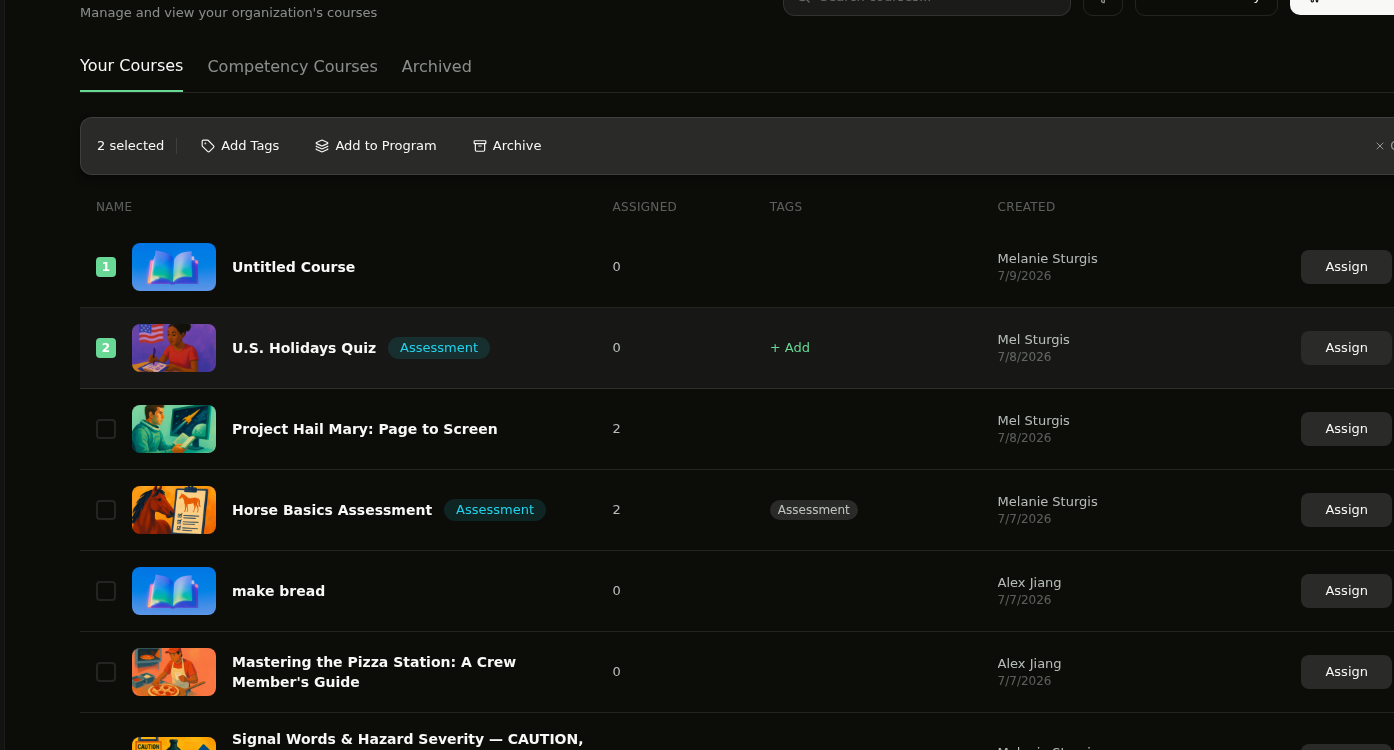
Go to the Courses page and click Select in the top-left of the course list. Click the checkboxes for the courses you want to add.
Step 2: Choose Add to Program
Once at least one course is selected, a bulk action bar appears. Click Add to Program.
Step 3: Choose the Program
In the modal, the Existing program tab is selected by default. Click the search field to see your programs, then select the one you want.
💡 Tip: You can also create a new program on the fly by switching to the New program tab and entering a name.
Step 4: Add the Courses
Click Add to Program to save your changes. The selected courses are added to the program.
Allow Out-of-Order Course Taking
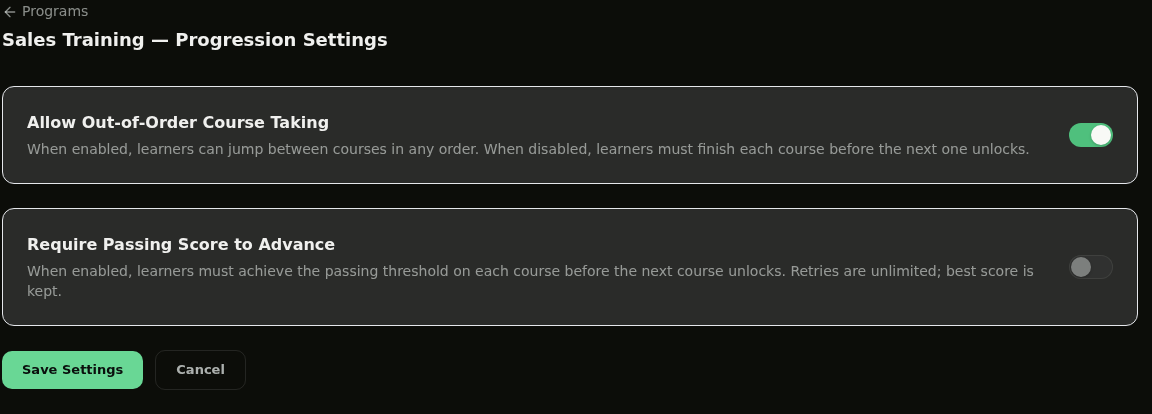
By default, learners must complete a program's courses in sequence — each course unlocks the next. You can turn this off to let learners take the courses in any order. A badge next to the program name shows In order or Any order so you can see the current setting at a glance.
Step 1: Open Progression Settings
Open the program and click Settings in the top-right to open its Progression Settings page.
Step 2: Turn On the Toggle
Switch on Allow Out-of-Order Course Taking, then click Save Settings. Learners can now start any course in the program in any order. Leave it off if learners must finish each course before the next one unlocks.
💡 Tip: When courses are taken in order, you can also require a passing score before the next one unlocks — see Score-Gated Course Progression, or release the courses on a schedule with Schedule Program Course Releases.
💡 Tips
Arrange courses in logical order to create a smooth learning path.
Use programs to combine related courses (e.g., "Technician Onboarding" or "Sales Mastery Series").
You can update a program at any time—changes automatically apply for all assigned members.